Yes, I love Christmas cards, but I struggle with finding a clutter free way to display them in our home. (Last year, for instance, I taped them up along the chair rail that encircled our dining room.) This year, I want to find an attractive way to display cards in our home.
Yes, its only July, but with the daily temps over 100F for the past week, I've got an early burst of Christmas fever. With the prompting of the girls over at Cowgirl Up! I decided to tackle this winter project in advance. (Plus, once the cooler weather does finally roll around, my project motivation will likely shift towards other holiday activities, like baking cookies with my kid :)
Without further ado, here's how I'll be displaying my cards this year....
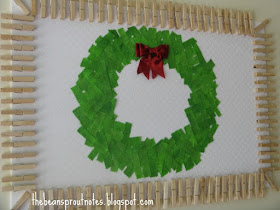
....in the grasp of a clothespin frame on a large piece of fabric lined art.
For this project, I began with a large piece of foam board wrapped in a nice piece of white fabric. (If you look closely you will notice the fabric's pretty white on white pattern.)
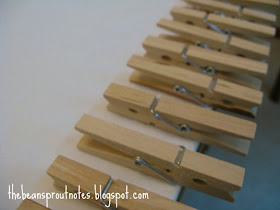
I then glued approximately 95 clothespins around the perimeter in an alternating up down clip orientation.
Note: Consider the length of your glue gun cord before laying out your project. I ended up needing an extension cord to reach the far side of the project. Silly? Yes. But I didn't dare move my project until after all my carefully laid out clothespins were safely glued down.
Then, using pinking shears, I cut small strips of a multi-toned green fabric. The fabric was leftover from my daughter's birthday shirt (we had a hungry caterpillar party). It was roughly 3/4 of a fat quarter.
The fabric scrap wreath was intentionally designed to be flat and simple to easily accommodate a large volume of cards. We exchange a lot of cards, so by keeping the central design two-dimensional, I can easily cover the wreath portion with cards as the season progresses.
The wreath's bow is attached by a hair clip to a loop of fabric specifically glued for this purpose. I like things to be reusable. If, I decide at some point, to also use this display with kid's birthday cards, I can swap out the red Christmas bow for something else.
After attaching hardware to the backside (I used a glued on pop tab) the card display is ready to mount on the wall!
------------------------------
Cost Breakdown:
Foam Board: $1 Dollar Tree
Clothespins: $2 for a pack of 100 at Walmart
White Fabric: ~ $2 I used roughly a fourth of a $7 section of fabric
Green Fabric: free (scraps from another project)
Total Cost: $5
Time: A few hours. It did take some time to neatly glue all the pieces down, but I was also simultaneously watching a TV marathon of the History Channel's "Pawn Stars" (hubby's new favorite show).
Lessons learned: If doing this again, I would choose a poster frame, or bulletin board instead of the foam board. I think it would do better in storage if the project had more support.
Happy Crafting!
Linking: Cowgirl Up!, Sugarbee Crafts


That's alot cuter than how I tape all of mine to the wall. You're making me look bad LOL
ReplyDeleteThat's a great way to display Christmas cards. I usually tape them to the fridge but I love your creative, frugal and organized way to show them off.
ReplyDeleteWhat a creative way to display your cards! Love this!
ReplyDeleteWhat a creative way to share your cards! Love this!
ReplyDelete