November 28, 2012

Glass Christmas Light Gift Boxes - 2012


Last year I shared my lighted glass Christmas box gift block {HERE} which has been popular with Pinterest and Google searches. This project was also a popular present among my family and friends, so I made a few more this year to give as housewarming and neighbor gifts. I made a few slight changes to this year's version, but still equally easy with no craft tools required. I've also included a mini tutorial at the bottom of post with tips for making your own.

This year I chose to use white stranded Christmas lights, instead of the green wires, and I also added a flat glittery ornament to the front of each block. Possible places to display your lit Christmas gift include the fireplace mantle, the kitchen counter, in a window well, or under the tree.


Pin It

This is a perfect project for beginners because it doesn't require any special tools (or skills). It is such a beautiful, yet simple project. I hope you feel inspired to make your own.


Glass Christmas Light Box Tutorial:

Assembly Time: Under 20 minutes (plus overnight drying of glue)
Total Price: $12 - $22

What you need:

  • 100 count Christmas light set. This year I chose white wires -- $3 at Walmart
  • Glass Kraft Block with pre-cut hole in bottom -- originally $12 at Hobby Lobby (less if you print a coupon from HERE)
  • Wire edged ribbon --  $2 - $6 per spool depending on style
  • Two-dimensional flat glittery ornament -- lime green "peace" ornament $1 at Walmart, snowflakes in multipack from Lowes 

What you do:
Step 1: Plug in Christmas lights to stretch out any packaging folds in the wire.

Step 2: Fold strand of lights in half and begin to fill inside the block using a spoon for assistance. Make sure to keep the "boy" end of the plug outside the box. (Folding the strand of lights in half before insertion results in a more natural light distribution.)

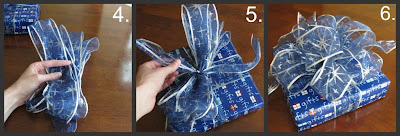
Step 3: Rotate block so opening is at the bottom. Wrap ribbon around sides and tie a bow. My full bow tutorial can be found HERE, but this single image from another project should give you the bow-making gist.

Step 4: Glue on your ornament. I used E-6000 industrial strength glue instead of a glue gun because I didn't want the heat from the lights to soften the bond. After applying glue, put something heavy on top of the ornament to secure a tight bond and let dry overnight.


Step 5: Enjoy!

Read about last year's version HERE
Sharing this project at any number of the creative link parties listed HERE

November 16, 2012

Surviving Your First Winter as a Stay at Home Mom


Before it fades into a distant memory, I want to take a moment and reflect upon the winter of 2010, my first winter as a stay at home mom. I'm not writing this post because my first winter was easy - I'm writing this post because my first winter at home was hard. I'm hoping to share the tips and tricks I learned during that first year to encourage other new at-home mommies.

Before I begin, let me give you a little back history. My daughter, now age two and a half, has become the sweetest and easiest child ever. (And I am now happily enjoying my days as a SAHM.) But it wasn't always that way. As an extremely colicky infant with acid reflux, the first few months of parenting rough. Because of the acid reflux, our pediatrician had instructed us to hold her upright for 30 minutes following each feeding. As I'm sure you can imagine, an additional thirty minutes tacked on to each midnight feeding, certainly starts to take its toll week after week. Not to mention the havoc it wrecked on my baby's developing sleep habits, as she had become accustomed to always falling asleep upright in my arms.
Six weeks old (I had a big baby)
It's sad to admit, but my memories of her first few months of life are little more than a sleep deprived "mommy- haze" to me. It took about five or six months for her to outgrow the colic, acid reflux, and establish healthy sleep habits. So although she was six months old in November 2010, I felt like it took that long for me to settle into a routine and find my mommy groove.

When she was six months old, I was finally ready to get out there and socialize with other moms. Except, I didn't know any other moms yet. All my friends were either co-workers, who had returned to work after children or friends who didn't have children. At that point I only knew one other stay at home mommy friend, but by the time I was ready to be social, she had just entered her own state of newborn exhaustion with the birth of her second child.  With the winter weather settling in, I couldn't exactly meet other mothers at the park and I didn't know how to meet other moms.

I tried to get involved in a few groups, but it was hard. First of all, you can't exactly Google search, "ways to meet other stay at home moms." Well you can, but you might not find what you're looking for. Its hard to find a group if you don't know specifically what you're searching for. (See below for list of international club names to search.)

After a bit of searching, I finally found a few groups that interested me, but by then it was mid November and with everyone's upcoming holiday schedules, many of the playgroups and clubs were on hold until the new year.

I felt very alone.

Maybe you feel this way right now. Maybe you're even second guessing your decision to be an at-home-momma.

But take heart! It will get better. (I promise!) Once you get involved and meet some other mommy friends, you'll feel much better. That, and finally getting a full night's sleep again ;)

Seriously though, being a SAHM has become such a fun and happy time in my life. I truly love it. But I before I could fully enjoy it, I needed to address my own needs - specifically, my need for socialization. At the bottom of this post, I list a number of organizations and websites to help you start your search for mommy friends, but in the meantime here are six easy things you can do to make your first winter year as stay-at-home mom more enjoyable.

Rockin' my 'New Mom' tee

Six Easy Tips for Surviving Your First Year as a SAHM
  1. Open All the Curtains - If your home is dark and gloomy, you'll probably feel that way too. So, pull back the curtains, lift up the blinds and turn on those lamps.
  2. Wear Jeans - As tempting as it is to stay in your PJ's after a long sleep deprived night, you'll feel more awake if you actually get dressed. You don't necessarily have to wear jeans, but avoid the sweatpants if you want to stay alert. If your pre-baby clothes still don't fit, don't fret about it, but treat yourself to few new outfits until you return to your previous size. 
  3. Make a Budget - The transition to at-home mothering often comes with a loss of income. Making (and keeping) a budget can become a rewarding task, especially if you are missing the academic component of your previous career.
  4. 'Pick Up' Mommy Friends at the Park - It feels strangely masculine at first, but don't be shy about asking for phone numbers. Local parks, story times, and indoor playgrounds are the watering holes for at-home mommies. When your kid is playing with (or next to) another child, an exchange of chit-chat will naturally flow between you and the other mother. If she seems like someone you could be friends with, ask for her number! Then be brave enough to call or text her to schedule a future playdate. It feels awkward but it works.
  5. Drink a tall glass of water first thing each morning - First year law students are instructed to drink a big glass of water immediately upon getting out of bed each morning. It is supposed to jump start your alertness level, boost your mood, and improve cognitive functioning. I don't always do this, but it really does seem to work. 
  6. Get involved - Get out of the house and do something. Join a mothers Bible Study, a playgroup, or a moms club. These groups are just as much about fulfilling your social needs as they are for your child's socialization. Reach out and get involved early on. You will benefit from a playgroup long before your child is old enough to actually play with other children.  Below is a list of organizations and websites to help you on your quest to meet other mothers.


Where to Meet Other Stay at Home Moms

  • Join a Playgroup, Club, or Group: See list below
  • Libraries: Check your local listings for storytimes and other toddler activities.
  • Community Centers: Local Community Centers or Parks and Rec buildings often host regular Open Gym Times for babies and toddlers during the day. Push toys, Balls, parachutes, and climbing toys are usually available for children to play with. A $1 entrance donation may be requested
  • Coffee Shops with Play Yards: In my area, there are a several coffee shops with indoor play yards for children. Some of these are located within large churches and open their indoor gymnasiums for family play during the day.
  • Children's Museums: Technically these are called children's museums, but really they are just fun places to play and explore. Depending on your area, sometimes these places are free. 
  • Park or Pool: If weather allows, this is a great place to meet other moms. Remember, being brave and asking for phone numbers of those you meet will allows you to begin a friendship and coordinate a second meeting.

Stroller parking at a playground playdate


Clubs, Groups, and Other Organizations for SAHMs

MOMS Club: (Moms Offering Moms Support) This is an international group with hundreds of local chapters. This is the group I am currently involved with and love it! Membership to the club is based on location so everyone in your chapter lives close by. This is especially great when your kiddo is little and you only have a narrow window of time between naps, feedings, etc. and don't want to drive far to meet up with other women.

The great thing about this club is that you set your level of involvement. You can participate in as many or as few activities as interest you. In my club chapter, there are many ways to get involved. There are age specific playgroups that meet at members houses on a weekly or bi-weekly basis. There are also organized weekly outings like the pool, puppet shows, library story time, etc. A babysitting co-op is also available to swap babysitting hours with your friends for times when you need to go to the dentist (or any other time). And lastly there are monthly "meet-ups" with guest speakers and also monthly Moms night out activities.

Here is the international website. http://www.momsclub.org/welcome.html  Check to see if there is a chapter in your area. You may need to message the email address given, as not all chapters host a website (and thus wouldn't be listed on that main page.) 


MOPS Groups are also popular club in my area. They usually meet at churches, but you don't need to be a member of the church to join the group (most women aren't). This group offers a little more structured "mommy-time." The meetings are every other week, and childcare is provided during meetings. Meetings usually include brunch, a friendship building activity and sometimes a craft. I am not currently involved in this club, but they are very popular in our area and a lot of strong friendships are forged through these groups.

Here is the MOPS website: http://www.mops.org/


Parents as TeachersThis program is funded through your local school district for children under 3yrs. It offers home visits every 8 weeks where a parent educator comes to your home to discuss child development and provide handouts on topics appropriate to your child's age. I really enjoyed this when our daughter was little because it helped me discover fun new ways to interact with her (little games and such that she could enjoy early on). 

Our district also offers a weekly playgroup during the day at one of the elementary schools. The playgroup is 60 minutes long and held in a room full of developmentally appropriate toys. The first 45mins are free play with your child and the last 15 minutes are teacher led circle time with songs. I waited until 10 months to start the playgroup, but I wish I had started her earlier! It is fun for the kids and fun for the moms too (to chat with other moms)

Check your school district to see if they offer this program! http://www.parentsasteachers.org/


Church: Churches are great social and spiritual resources and can be a great way to network with other women. If you don't have a church home, I encourage you to attend a service this Sunday. 


Are there other mommy groups available in your part of the country? Leave a comment with the name of the group, to help other women reading this post.


Passionate for SAHMs

Phew! Sorry for writing such a lengthy blog post, but I am just so passionate about helping other moms get started on this path of full-time mothering. It can be lonely in the beginning, especially when your child doesn't interact much yet. It is important (for your sake and your child's) to find ways to get involved and meet other at-home moms. You will discover a huge network of like-minded moms and make a ton of new friends. I made more friends in the first year of at-home parenting than I had made in the entire spanse since college. 

Despite a rocky beginning, I am happy to report that my daughter and I now have an active social life staying busy with our numerous friends through some of the groups listed above. I absolutely love being a mom, specifically, a stay at home mom. Sometimes I get a twinge of longing for my former career, but I've never regretted my decision. I hope you will love it as much as I do.  (And if for some reason it doesn't work out, there's no shame in going back to work. Not that I want to, but it's nice to know I have the option.)

Me and the Bean today. Loving my 2.5 years as a SAHM!


In order to make this the best possible resource for new moms, please include your personal suggestions and recommendations for SAHMs in the comment section below! 

(And if you want to chat feel free to email me!  thebeansproutnotes [at] gmail [dot] com.) 

Sharing this post at these link-up parties.

November 13, 2012

My Sister's Headband for the Glow Run 5K


My little sister is very fitness minded and always finds the most interesting ways to stay in shape while having fun. This year, she's been frequenting the 5k running circuit - but not just your typical 5k race - oh no, she finds the most unusual and creative runs to compete in. 

In May, she ran the Warrior Dash, a strenuous obstacle course beast of a race. In June, she ran a Color Run, where participants wear white and have powdered paint thrown onto them as they run past. A few more typical races filled the later half of the summer and this past weekend she competed in a Glow Run, a neon infused 5k race (3.1 miles) complete with black lights, glow sticks, and a hoppin' post party. 
My little sister at the Glow Run
So what do you wear to a glow run? The answer is neon. And wear as much neon as possible. At least that's what I'm told. I've never been to such a run. But with the black lights on, the neon attire lights up fabulously. 
Here are some race day pics of my sister and her friend. Do you like her neon party tiara? (It was made by yours truly, so you better like it. ;)
Truth be told, I didn't have the Glow Run in mind when made this brightly colored headband. Actually, I made a few of these headbands for my first craft show (an itty bitty event with only 6 vendors) and marketed them as dress-up tiaras for little girls.

Oh and just for grins, you know what my sister's next race will be?
An Ugly Christmas Sweater 5K  :)

Pin It


November 12, 2012

Hubby's 28th Reeces Cake

My Reeces loving husband said this was his best birthday cake ever. His cake decorating wife smiled because it was also the easiest cake I've ever decorated.

Happy 28th Birthday!


November 5, 2012

Thanksgiving Table Vignette: 3D Paper Garland


I have a confession to make. I don't do mantle displays. I'm not opposed to mantel displays. In fact, I love looking at how others decorate for the various seasons and holidays. But when it comes to my own mantel, I'm intimidated by the size of it and never touch it except for some pre-lit garland and stockings in December.

However, I love Thanksgiving and the warm fall colors. This year, I chose to decorate my dinning area with an autumn themed table vignette. All of the items on display were DIY or repurposed from other areas of my home.

Thanksgiving Tree and Vase
The glass vase is filled with decorative rock and the exterior is wrapped in raffia and adorned with polyester fall leaves and bow. A few sticks from the yard were spray painted white to become the "tree."

3D Paper Garland
The focal piece of the display is the paper garland tree. The garland is made from scrapbook paper sewn together. I bought a bulk package of card stock paper in corresponding colors and used a 2"circular paper punch to create tons of circles.

To machine sew the garland, stack four like colored circles directly upon one another and sew a line down the center. Continue sewing through air to create the void or string portion of garland between each 3D rosette. Guide the next stack of 4 circles into the machine after the previous set has fallen over the back edge of the machine. (This will ensure the paper roses are evenly spaced.) Upon sewing completion, fold open the paper disks to create a 3D effect.

Also on the wicker tray is a stuffed fabric pumpkin (gift) a small vase filled with pinecones (collected on our summer vacation) and a raffia wrapped ampersand - which started out as a diaper box (read about that HERE).

Happy Autumn! Thanksgiving is only 2.5 weeks away!


Linked: Sugar Bee Crafts, Uncommon, Happy Hour Projects, Keep Calm and Link Up, Sew Many Ways

November 1, 2012

Tutorial: Easy Ribbon Headbands


Match any style, occasion, or school team colors by making your own ribbon headbands out of any piece of ribbon. Sew your favorite ribbon or decorative trim onto elastic hair ties for a stretchy taunt headband that stays in place. In preparation for my first craft fair this weekend, I've sewn up several of these headbands using a sparkly purple ribbon to match the high school's team colors. Here's how to make your own.

What you need:
2 elastic hair ties
Piece of ribbon
Needle and Thread

Step 1. Begin by loop knotting the two elastic hair ties together.


Step 2. Don't cut the ribbon yet. First sew one side of the headband by folding the ribbon end around one of the elastic hair ties. Sew. (I used a machine, but you could easily hand stitch a project this small.)


Step 3. Measure ribbon to fit your head and cut to size. To do this, wrap around your head while slightly stretching the elastic ties. Use your finger and thumb to pinch the ribbon at desired length. Remove from head and add an additional inch for seam allowance and cut.

Step 4. Finish the headband by sewing close. (Same technique as step 2)

Enjoy!

Linked: Llive Laugh Rowe