February 27, 2014

Magnetic Display for Printables and Project Life Cards


I love decorating my home with printables that I find online. And because many of them are free, you can download, print, display, and swap your art as often as you like. Searching for Project Life cards (and resizing in Microsoft Word) is another great way to find graphic art prints for your home.

One way to display and rotate your collection of printables and project life cards is by creating a magnetic display stand like the one shown above. What appears to be washi tape, is actually magnetic strips covered in scrapbook paper. The structural component is an approximately 5x7 metal stand which has also been covered in scrapbook paper. (You could also create a non-magnetic version using a wooden stand and mini clothespins.)

 
A colorful envelope is attached on the back to neatly store your collection of printables.
 
 
This project was a Christmas gift for a good friend of mine who recently birthed three kids within 25 months. Needless to say, her life is very busy. The cards I chose to include with the gift were mostly cheery and uplifting in nature, but you could create this gift with any theme. Another great idea would be to include a holiday set with a different printable to display in each season. The beauty of this project lies in its easy interchangeability.
 
 
As I mentioned earlier, I used both Project Life Cards, and free printables which I downloaded and printed at home. But most of them were either too big or too small to fit my needs. To fit this project, most of them needed to be resized. To do this, I simply opened Microsoft Word, inserted the downloaded image, and resized by dragging the corner edges before printing. I would also recommend printing on something sturdy, like cardstock.
 
A vintage feel was given to some of the cards by rounding the corners and inking the edges.
 
 
This gift was such a fun project to make. I think I need to go make one for myself!   


 Sharing at these awesome link up parties!


February 26, 2014

Easy Panel Crib Skirt from a $5 Walmart Bed Sheet

 
Hey everyone! Today I am going to share with you just how easy (cheap) it can be to sew your own crib skirt. By using a twin sized flat sheet you can save money on fabric and save time by utilizing the already hemmed edges. I made the crib skirt shown above for less than $5 using a flat sheet from Walmart.
 
This is the same crib we used with our first child and last time we didn't use a skirt. But with a growing family and shrinking closet space, I anticipate I'll need to use the under crib storage space this time and as cute as those floral storage containers are, I'd rather have them discreetly hidden behind a crib skirt.
 
I've seen some really cute DIY ruffled crib skirts, but frankly, I'm not that good of a sewist so a flat panel crib skirt was a better option for me. It's literally just two rectangles of fabric tied to the mattress frame.
 
 
Step 1: To begin, you will need to measure your crib with the mattress at the highest (newborn) setting. Consider if you plan to hem the cut edges and add extra for seam allowances as needed.
 
Step 2: Prewash and cut your fabric. If you are strategic in your placement and cutting, you can eliminate the need for hemming two of the four sides by utilizing two of the bed sheet's hemmed edges.

 Step 3: If desired, press and hem the two cut edges.
 Step 4: Cut fabric for remaining panels. Again, making use of the manufacturers hem line means less work for you.
 Step 5: Sew small strips of ribbon to back side of the panel. These will tie the skirt to the mattress springs.
 For me, I found it easiest to sew back and forth down the center of a single piece of ribbon near the hem line. Backstitching for stability.

Step 6: Tie to mattress springs and you're all finished!


February 13, 2014

Save Grandma's Wedding Dress in a Keepsake Necklace


If you follow me on Pinterest, you might have noticed I've been pinning a lot of vintage bridal shower ideas recently. As Matron of Honor, I've been having fun helping my sister brainstrorm ideas for upcoming vintage themed wedding. (Check out the clever way she asked her bridesmaisd, written about here.)

Part of her vintage chic wedding planning included using Grandma's heirloom wedding dress in some sentimental fashion. My crafty and talented sister decided that with a few modifications, Grandma's wedding gown would be the perfect dress to wear at the rehearsal dinner the night before. With some serious sewing skills which I wish I possessed, my sister altered the conservative looking gown into a hip vintage chic dress with a more flattering, and modern looking cut.

After completing alterations, my sister gathered up lace and fabric scraps from the dress, and  preserved pieces of Grandma's bridal gown in these chic memory charms. She made several of these necklace pendants and gave one to each of the women in our family at Christmas this year.

I wear my memory charm as a necklace. It's nice to have a sentimental piece of family history in such a modern presentation. Thanks Sis!

This project may be shared at some the Link-up Parties listed HERE

February 4, 2014

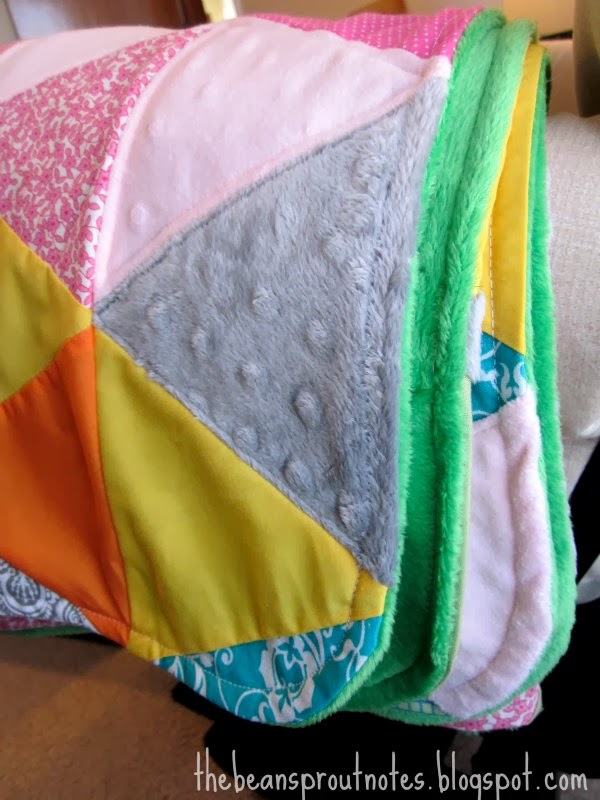
My First Triangle Quilt: A Colorful Baby Blanket with Mixed Fabrics

Slowly but surely I am overcoming my intimidation of the sewing machine. Completing a denim blue jean quilt last summer gave me the confidence I needed to tackle other sewing projects, like the fabric name banner for my daughter's big girl room, a crib skirt, and now,  another quilt. 

This time I tackled my first triangle quilt. I chose to make a bright and colorful blanket pieced with mixed fabric types - some pieces are cotton, some are minky. Babies love contrast. 

I thought equilateral triangles (three equal sides) would be easier than isosceles triangles. I cut triangles from strips of fabric measuring 5.5" in height and using the 60 degree marker line on my sewing ruler. 

Piecing a triangle top is a bit trickier than a square quilt, but still very doable, even for a beginner like me. The trick lies in precision cutting of your triangles.
I rounded the corners and then attached the quilt top to a kelly green minky backing. (Right sides together leaving a small opening, invert and finish with a topstitch.)

For the "quilting" I stitched around the inner edges of selected triangles to bind the front and back together.  
The most difficult part of this quilt was sewing the light pink and grey minky pieces. Even though I had worked with minky before, I learned a few new things. First, not all minky is created equal. The light pink and grey pieces are both minky, both with a raised bump pattern, and both purchased at the same store. They appeared to be nearly identical. However, the grey minky stretched and warped to great extent, while the pink was relatively easy to sew. I have no idea why the difference.

And interestingly enough, I also learned that a hot iron can accidently iron out minky's raised bumps. See the two light pink triangles near the right margin of the photo above. Ooops! 


I can't wait to cuddle up with blanket and baby for midnight feedings. Only 9 weeks to go!

Thanks for stopping by
Follow Me on Pinterest!
This project may be shared at some the Link-up Parties listed HERE

February 1, 2014

How to Cut Thick Glitter Sequin Paper with Your Silhouette Cameo


One of the first projects I attempted with my Silhouette Cameo cutting machine was a monogramed piece of nursery art featuring that thick glittery paper you often find in the scrapbook aisle. I'm sure you've seen this type of paper before, it is super thick with glitter so substantial it looks like mini sequins. The only problem is, the Silhouette (and every other cutting machine) struggles to cut this type of paper. However, you can still use your Cameo to get perfectly cut designs with glitter sequin paper if you're willing to take a few extra steps. Let me show you what worked for me.

First you need to design your cut file. In my project it was a giant letter "E" for the first initial of baby's name.

Because the Cameo struggles to cut sequin paper, we won't be feeding it into the machine directly. Rather, we will cut our design onto a piece of regular scrapbook paper, which will serve as our stencil.

The next step is to remove the shape from the cut mat and tape to the back side of the glitter paper. The more tape, the better. IMPORTANT: Be sure to tape your image down in reverse!!


The final step is to carefully cut along the edges of your stencil. Regular scissors worked fine for me, but if your design is more intricate you may need to use a craft knife.


And that's it. Easy peasy! Perfectly cut glitter paper designs with a little help from our cutting machine :-)


Thanks for stopping by!
This project may be shared at some the Link-up Parties listed HERE
Follow Me on Pinterest!