May 31, 2012

Crazy Flexible Collage Layouts

Have you seen the new features at Pic Monkey? I must say, its new collage features are AH - MAZING! They offer super flexible layouts that literally let you build you're own collage dimensions and arrangements. Crazy flexible! It is far superior to the old Picnik and basically rivals what I can do in Photoshop Elements (PE).

Here is an example of a collage I whipped up in less than five minutes on PicMonkey. Pretty good for a free photo editor and only five minutes of my time! With a few more minutes of attention, I could have evened out the face sizes and zoomed/cropped the center image. (This collage was just a test run.)

I made a nearly identical looking collage for family earlier this month with Photoshop Elements, except I made the improvements listed above (evened out the zoom ratio on the head shots and cropped in the center image). Yes, the version I made in PE is slightly better, but it took so much, MUCH longer to create.


I'd show you my photoshop version for comparison, but I don't feel like blurring out her full name (which is included on the "real" one I made for family) so you'll just have to take my word that the new PicMonkey collage features are nearly identical to what I can do in PE.

Go check it out at picmonkey.com!

Mischele

May 29, 2012

Building My Backyard Oasis - in the shade of the oak


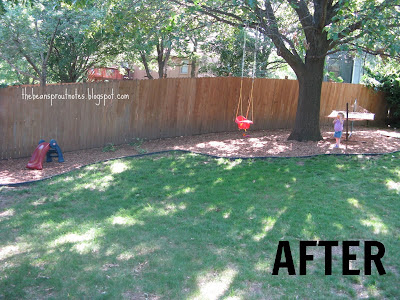
Much of my spring cleaning this year was centered on large project in the back yard. By suburban standards, we have a spacious lawn with mature trees. The large lot and mature backyard were key selling points for us when we purchased our home several years ago. Yet today, we seldom venture off the deck and the majority of the yard is significantly underused. 

My goal was to build an inviting backyard area (other than the deck) that we could enjoy all year long. An outdoor area where we could play on even the hottest of summer days. And I am proud to say I successfully built just that. I am absolutely thrilled with how this project turned out, but in order to really appreciate the transformation, you must first look at what I started with.

Early spring, before the tree leafed out
To give you a sense of the size of our yard, the photograph above only shows about a fourth of the backyard.  I chose this section of the yard because a) the grass never grows under the tree anyways - we've tried, and b) because that oak tree is so large, that at any time of day, despite shifting shadows, there is always shade directly underneath.

(Totally off topic, but did you know that PicMonkey now offers collage features!! Hooray!)

Before I started...
  • I raked up the residual leaves that had fallen this spring. (Did you know that some varieties of Oak trees hold onto their leaves until late February or March?)  
  • Clean and reposisiton the skeleton hammock frame.
  • Laid out the garden hose to envision my design and measure amount of edging length to buy.
  • Dug out any grass growing within my border (there wasn't much)

My little helper

Then I got to work...
  • Digging a trench to bury the edging.
  • Placing the edging and securing with metal stakes into the ground.
  • Back fill the edging with dirt.
  • Transplant a few hostas from another location to help with slope erosion.
  • Replace broken hammock
  • Move baby swing from another location.
  • Placed a large square paving stone as a chalk board.


I absolutely love how this turned out!! My kind husband helped haul the bags of mulch out of the car for me, but other than that I was able to do this all on my own. And I am super proud with the results. This project has literally changed the way I live. We are out in the yard all the time now.

The driveway is in full sun most of the day. This paver stone is the perfect chalk solution under the tree's shade. 

Now excuse me while I go read in my hammock before the Bean Sprout wakes up from her nap :)
Mischele


Note to self: the perfect tree swing knot looks like this. (fold up, around, around, and down in the hole)


linking: Sugar Bee Crafts, Cowgirl Up, UncommonBear Rabbit Bear


May 24, 2012

Chemo Sucks


I recently received some terrible news. A college friend of mine has been diagnosed with Hodgkin's Lymphoma and began chemo treatment this week.  The sucky thing about cancer is that it knows no rules. You never know who it might strike. You certainly wouldn't guess it would choose a vibrant 28 year old with two small boys who call her mama....

Back in the day, I used to see my friend Jessi 3-4 times a week through various Lutheran Student Fellowship activities, a Christian organization on campus, which we were both fairly involved with. Here we are circa 2005. Jessi is on the far left.

To show my friend some love and support, I am sending her this chemo sucks lollipop bouquet. With her spunky personality, I am sure she will appreciate my attempts to lighten the mood.

I debated on whether to say cancer sucks or chemo sucks, and I even debated whether "sucks" was an acceptable word in a home with young children. Ultimately, I decided that her fun loving spirit would appreciate a little comic relief. Afterall, a sucker bouquet in a sucky situation is mildly amusing. If nothing else, she'll know we're thinking of her.

I believe in the healing power of prayer, so if you are reading this, could you please pause and take a moment to pray for my friend Jessi and her young family. Pray for healing. Pray for peace. And above all, pray that His will be done.

Thank you
Mischele

p.s. If you'd like to make a similar display, feel free to copy this jpeg for personal use.

And here's a peek at the inside (read the comments for more details on assembly)


May 22, 2012

Lemon Drop Cookies: Semi - Homemade

Pin It

These refreshing little cookies are a summertime favorite at our house. With only three ingredients, you get the fun of baking cookies without the time and mess of more involved recipes. It only takes 15 minutes from the time you even enter the kitchen until the first batch goes in the oven, and in another 15 minutes, or so, you can have two baking sheets worth of cookies cooling on your counter with the dishwasher loaded, supplies put away, and kitchen wiped down. Half an hour to warm yummy cookies and a clean kitchen? Now that's a recipe worth keeping!


To be fair, this is not an original recipe. I found this recipe on the back of a Duncan Hienes cake mix a few years ago. (Although, today I'm using a Betty Crocker brand) Have you ever noticed that some of the best recipes come from the back of food packages? Seriously, some of my favorite recipes have been clipped off of package labels.


Shopping List
Lemon Cake Mix (any brand, even generic will do)
Lemon Icing (optional)
eggs (one)
butter (one stick)
water (two Tablespoons)


Preheat oven 350 degrees.


Melt butter and mix with egg, cake mix, and water.


Spoon drop onto baking sheet

(teaspoon size)

Bake at 350 degrees for 7-10 minutes


Cool and apply icing if desired.


Enjoy!

Just look at that crispy bottom, yet soft and crumbly center - how could you only eat just one! (This batch was baked for 10mins. If you don't care for crispy edges, then I recommend using the lower end of the time range)


~ Mischele
linking: Sugar Bee Crafts, Mommy by Day Crafter by NightUncommonthekurtzcorner.comPositively SplendidSugar and Spice

May 17, 2012

30 before Thirty

In a little under two years, 638 days to be precise, I will reach the big 3-0, turning thirty in February of 2014. Inspired by the commencement speech given at my little brother's graduation, (and also the numerous 30 by 30 lists I've seen other bloggers share) I've decided to lay out a plan to accomplish 30 goals  before turning thirty. In no particular order they are.....


1. Buy a big flirty straw beach hat


2. Sew a dress for myself - and be proud enough to wear it out of the house 


3. Attempt a furniture refinish - trash to treasure style!


4. Submit something for publication. 
Notice the careful word selection focusing on the submission, not the publication. (I'm thinking guest posting on other/bigger blogs.)


5. Host another murder mystery party for our friends.


6. Visit a winery with The Hubs.


7. Complete at least 5 pins from my Pinterest boards.


8. Reach 50 blog followers.


9. Likewise, find 50 blogs to support and follow.
GFC for Blogger blogs, Linky or Reader for the others.


10. Learn to sew a button hole.


11. Sew a Jean Quilt. 
I started one awhile ago - most of the pieces are already cut - but the project's lay idle for over a year now.


12. Build a sandbox for my kiddo.


13. Find a Thai recipe that I can actually cook, and the family will actually eat.


14. Edit family highlight videos for 2011, 2012, and 2013. 


15. Learn to use Photoshop Elements.


16. Attend an auction.
We've been watching a lot of A&E's "Storage Wars" recently. I think an auction looks like fun, even if we're just spectators.


17. Attend a rodeo.
I've spent my whole life in Kansas and Missouri, but I've never been to the rodeo.


18. Buy a handmade craft on Etsy.


19. Finish the Laundry Room Update. This is another project that has been lying dormant for over a year.


20. Attend a ballet, other than The Nutcracker. There is an amazing new Performing Arts building in town. We saw The Nutcracker last year and now I'd like to return and see another.


21. Learn which relationships are worth cultivating/maintaining.


22. Learn to accept that some friendships were meant to fade with time.


23. Build a wardrobe of at least 4 awesome date night outfits.  


24. Learn to cook one awesome meal for a date night at home.


25. Gather telephone numbers from all my immediate neighbors.


26. Memorize the phone numbers of at least 3 local friends. 
In case of emergency, it's nice to know a few numbers without having to rely on your cell phone. 


27. Read the Bible cover to cover.
I've always avoided the book of Revelations, and I'm sure I've missed parts of the Old Testament too.


28. Complete one clothes refashion (or resize a shrunken garment).


29. Define a chore schedule that works for our home. The chores currently do get done, but I think I'd benefit from a written routine.


30. Successfully potty train our toddler.


Yes, a few of these I was planning on doing anyways, but 30 is a long list! 


In order to be successful, I need to achieve, on average, one item every 21 days. Time to get busy :-)


~Mischele


June Update (Click Here)

May 14, 2012

Don't Follow Your Dreams: Commencement 2012

Don't follow your dreams was a key point in the commencement speech given by the keynote speaker at my brother's graduation - a thought provoking statement that's kept me pondering all weekend long.

My little brother earned his degree in Engineering, and graduated with honors from the University of Missouri this past weekend. To celebrate the occasion, we took a day-trip to Columbia for what the Bean Sprout kept calling his "special day." It was a pleasant day in which we visited with family, toured the campus, and ate at our favorite local pizzeria. As alums ourselves, it was especially fun for my husband and I to revisit our old stomping grounds, at the school where we first met.

We also attended my brother's formal graduation ceremony. I've sat through a number of commencement speeches in my life, but never one that's made a lasting memory - until now. This thought-provoking message has kept me thinking for several days.

In her opening point, the speaker urged the graduates not to follow their dreams.

Dreams, she cautioned, are built on hopes and wishes. And when a dreamer becomes fixated on the hopes and wishes of their dream fulfilled, they can sometimes forget to lay the groundwork and pave the path needed to reach their dream. When this occurs, a dreamer is nothing more than a dream chaser.

Instead, she urged the graduates to find their passion and formulate a vision. Once the vision is established, engineer a plan to achieve that vision. (Nice word choice on the speaker's part, since it was a graduation ceremony for the engineering students :)

The difference between dreamers and visionaries, the speaker explained, is where the focus lies. While dreamers are wishfully thinking about the end result, visionaries are actively establishing a plan and then pursuing that path to turn their visions into reality.

To sum it up, the speaker encouraged the crowd to

  • find a passion
  • form a vision and 
  • engineer a plan to achieve it
It's been many years since I graduated, but this commencement speech had a profound impact on my life. In fact, it might have been just as beneficial to me as it was to its intended audience, the class of 2012.

I leave you with some food for thought for the upcoming days: don't follow your dreams.

~Mischele

May 10, 2012

In True SAH-Mommy Style


This is me. In real life. No false illusions here, I'm an ordinary, everyday mom. Here is a common example of my early spring wardrobe.

In true SAH-Mommy style...
There is mud on my jeans from a morning of fun playing outside with the Bean.
Peanut butter fingerprints decorate my sleeve as little souvenirs of a lunch time hug.

A favorite ball-cap hides the fact that springtime humidity has left my hair frizzy.
My shoes are old. My clothes are worn.


I no longer meet appreciative patients and I no longer get paid. I know it's cliche, but I seriously have the best job in the world - being a full time mommy. I almost didn't make this choice, but I'm so glad God has led me to where I am today!

~Mischele


May 9, 2012

Best of the DIY UFO Challenge

Last week's UnFinished Object Challenge, was a blast to help co-host. It was so fun seeing all the wonderfully talented submissions. One project particularly stood out in my mind and I'm pleased to showcase it here today.

My feature for this challenge goes to Cristina, at Remodelando la Casa.


She took an ordinary bathroom and made it fabulous, without replacing any of the major bathroom fixtures. The doorless vanity and paneled tub - those aren't new pieces, simply modified versions of the pre-existing. You've got to check it out. It's truly inspirational.

(And Cristina, here's your button :)


The Bean Sprout Notes


My other co-hosts are also showing off their favorites from the link party. Check them out!

Kim from The Money Pit
Lisha from  One House, One Couple
JoAnne from Double Wide in the Sky


Until next time,
Mischele


May 7, 2012

A Greek Yogurt Taste Test (5 brands) and Nutrition Review


The popularity of Greek yogurt has been skyrocketing in recent years. The product is now popping up everywhere: TV commercials promote the product, news and talk shows reference it, and even my limited-options-discount-superstore carries an ever expanding selection. But what is the difference between regular and Greek yogurt, and why all the hype?

For starters, Greek yogurt differs from regular yogurt in the way it is made. By straining off the liquid whey, Greek yogurt has a thicker, fluffier texture. Celebrities praise it's hunger satisfying properties, calling it the perfect snack. Nutritionists tout Greek yogurt's decreased sugar and more than doubled protein content as the clear winner of the greek vs. regular yogurt battle.

But does it taste good? I decided to find out for myself.

My initial evaluation included four popular brands; Danonon Oikos, FAGE, Chobani, and AE. I  have since tried a fifth brand, Yoplait's Greek version. I assessed flavor, and compared nutrition labels. When possible, I chose the peach variety for this taste test. Areas of particular interest to me on the nutrition labels were protein, sugar, and the ingredient list.


BrandSizeProteinSugarFatCaloriesArtificial Ingredients?
FAGE5.3 oz13g16g0g120 calno
AE6 oz14g19g3g170 calyes
Dannon Oikos5.3 oz12g19g0g130 calyes
Chobani6 oz14g19g0g140 calno
Yoplait6 oz12g20g0g160 cal
Regular yogurt6 oz5g26g1.5g170 cal


Nutritionally, Greek yogurt is the clear victor in terms of protein and sugar content when compared to regular yogurt. And the taste isn't bad either, although the mousse-like consistency does take a little getting used to. The only brand I disliked on taste was AE (Anderson Erickson).  Their Greek yogurt had a sickenly sweet "fake" taste about it.

Overall, I chose FAGE and Chobani as the two winners. They scored the best nutritionally, come in a variety of flavors, and they both taste great. Chobani is a tad bit cheaper, so that's the brand I've been buying. But FAGE is fun because you control how much flavor goes into your yogurt with the separated fruit cup. 


Has anyone else made the switch? Have you found a favorite brand, that maybe I missed?


~Mischele

May 3, 2012

Blanket Applique with Faux Chenille [and a mini tutorial]

Pin It
Mesmerized by the faux chenille baby blankets showcased HERE on The Aesthetic Nest and also HERE on Made, I knew I just had to try their technique. Except, the assembly process for an entire blanket seems quite tedious, so I decided to experiment with using faux chenille as an applique.
Faux chenille is made by sewing (on the bias!) three or four layer of flannel in numerous closely spaced rows. The top layers are then cut apart, leaving the bottom layer intact. During the washing and drying process, the top snipped layers will begin to fray and curl thus resulting in the faux chenille look.

These images were taken following the first washing and drying. With each subsequent laundering, the the layers will fray more and more, resulting in a fluffier and fuller appearance overtime.
My daughter selected this fabric herself. She's always loved stars, and is especially fond of her new "star blankie".

Mini tutorial for appliqueing with faux chenille.

It might be a good idea to refresh yourself on the faux chenille process in general, by reading either of the two links in the opening paragraph. Both were very helpful to me. The most important detail is to remember to sew on the bias. YOU MUST SEW AND CUT THE FLANNEL ON THE BIAS FOR IT TO FRAY PROPERLY.  Failure to do so, will result in a stringy mess during laundering.

1. Determine the bias. This is usually the diagonal dimension. If you are unsure, give your fabric a little tug. Fabric pulled in the bias/diagonal direction will have more give (will be stretchier). The stretchy dimension is the direction you want your rows to run.

2. Layer and pin your fabrics. 3 layers is fine, but 4 layers will make a fuller looking chenille. 

3. Sew row after row of stitches on the bias/diagonal. Both resources I read said to space the rows 1/2 inch apart, but for an applique I would recommend slightly narrower than that.

4. Cut out pieces to assemble your letter/shapes. Luckily for me, the "L" was very simple. The stars proved to be more tricky.


5. The next step can be done two different ways. You can either attach to blanket (stitch along the perimeter) and then cut the channels last, or you can cut the channels first and then attach to the blanket. I tried it both ways. Cutting the channels first, might have been slightly easier.

Just remember when cutting the channels that you need to leave the bottom layer of fabric intact. Do not cut through the bottom layer!

6. Because the letter "L" is non-reversible, I didn't want the stitch marks to show on the backside of the blanket. Therefore, I sewed all the appliques to the top layer only - before joining the two layers of star flannel.

7. Finish assembling your blanket.
8. Wash and dry to fray!

Enjoy!
Mischele


May 1, 2012

It's Time for a Link Party!


The Bean Sprout Notes

Do you have any UFOs (UnFinished Objects) lurking in the corners of your garage, closet, or basement? I know I certainly do! I think it's the nature of us crafters and DIYers to have numerous projects in various states of completion in all corners of our homes. 

Well, earlier this week I teamed up with four wonderful ladies to challenge ourselves and our readers to tackle some UFOs and complete those long awaited projects. What projects have you finished recently? Big or small, we'd love to share your excitement in crossing an item off the to-do list. 

And if you haven't completed anything recently, don't worry, there's still time! This link party will be open through the end of Sunday - perfect for all you weekend warriors. 

All projects, big and small are welcome and linking up here will simultaneously post on all five of the co-host's blogs. Favorite entries will be featured next week. 

The co-hosts for this party are,
Kim from The Money Pit
Lisha from One House, One Couple
Micki from ADD Housewife
JoAnn from Double Wide in the Sky 
Mischele from The Bean Sprout Notes

It's time to party!!

Baby Proofing the Kitty Litter Box

We have a cat. And a curious toddler....

A few weeks ago I was cooking in the kitchen when the house became unusually quiet. Any mother can tell you that a quiet toddler should not be trusted, and my child is no exception. I put down the skillet and went to investigate. This is what I found:

Yeaahhh. That's not cool. I knew this day was coming, and honestly, I'm surprised we made it this far without a "sandbox" incident.

Long ago I pinned this [click for direct link] awesome concealed kitty litter box as a potential solution for our home. The author brilliantly added a doggy door to an IKEA cabinet to hide the cat box. I tagged this idea in my "bookmarks" folder for months ago, but kept putting the project on hold. After our recent sandbox incident, I knew it was time for me to finally replicate the idea.

Imitating the concealed litter box idea with an old sink vanity cabinet seemed like the perfect gateway project into the DIY world of furniture renovation. Coincidentally, it was also a perfect project for the UFO Challenge that I am helping to co-host.


Remember that hideous laundry room photo I shared with you earlier this week? As much as it pains me to repost it, here is a reminder of my awful mess of a laundry room. Yuck.

As a part of the bigger laundry room renovation, we have since replaced that yucky cheap laminate vanity (and sink) shown on the left. As cheap and yucky as it was, I decided it still had some life in it and saved it to be repurposed as a concealed cat litter box.

Here's the vanity in my garage, waiting to be transformed. Without the sink top, the cheapness is even more evident. 

Unlike my inspiration, I chose not to use a pet door, but rather a simple open doorway for my cat to enter the cabinet. I cut the door on the far side of the unit, so it will be out of sight when entering the laundry room. My Dad came over with his jigsaw to cut this opening for me. {thanks dad!}


As a first time furniture renovator, I'll spare you the nitty gritty of my next few steps. I'm sure my novice technique would make many of you cringe anyway.

After adding a new top, and some new paint, here is the finished product. From the laundry room doorway it simply looks like a cabinet; aesthetically pleasing to me, contains some of the kitty stink, and most importantly, it hides the litter box from my daughter - triple score!

With a total cost of only $8 (the material for the top, we already had primer/paint), I am thouroghly pleased 
(and yes I bribed my cat to pose for that last photo) 

So how about you? Have you completed any long overdue projects recently? Projects of any size and any genre are welcome. (Doesn't necessarily need to be a DIY project) We'd love to see them at the UFO Challenge link party open now through Sunday night.

~Mischele